
In a laboratory environment, selecting a sound level meter is not simply about picking the “cheapest” or “most popular” model. You must align the meter’s accuracy class, measurement capabilities, data-logging functions and calibration traceability with your specific application, regulatory requirements and long-term usage scenario. Below we provide a practical selection framework and recommendations tailored to common laboratory scenarios.

Core Concepts You Should Know
Accuracy Classes – Class 1 vs Class 2
International standard IEC 61672-1 (Electroacoustics – Sound Level Meters – Part 1: Specifications) defines two performance categories (Class 1 and Class 2) for sound level meters.
- “Class 1” meters have tighter tolerances, broader frequency range, and better stability than “Class 2”.
- “Class 2” meters are still compliant, but for more general use and not necessarily precision laboratory measurement.
- Older standards (e.g., IEC 60651) used “Type 1/Type 2” terminology; under IEC 61672 these become “Class 1/Class 2”.
Hence, when you see a meter labelled “Class 1 (IEC 61672-1)” or “Class 2”, that gives you a key indication of its measurement fidelity.
Frequency Weighting & Time Weighting
- Frequency weighting: SLMs typically offer A-, C- and Z-weighting. A-weighting (dB(A)) is commonly used for human-noise response and environmental/occupational noise assessments.
- Time weighting: “Fast”, “Slow” (and sometimes “Impulse”) modes define how the meter smooths fluctuations in the sound pressure level.
For laboratory settings, you may also require built-in functions for equivalent continuous sound level (Leq), peak levels, octave-band or 1/3-octave-band filters if you are analysing frequency content.
Data-Logging, Analysis & Traceability
In a laboratory, besides simply reading an instantaneous decibel value, you often need:
- Time-stamped records for reporting
- Statistical functions (L10, L50, L90, percentile levels)
- Data export (USB, Ethernet, WiFi) for post-analysis
- Calibration traceability (i.e., calibrator certificate, model’s pattern approval)
These features elevate the device from a “survey instrument” to a laboratory-grade measurement tool.
Common Laboratory & Monitoring Scenarios and Class Recommendations
Precision acoustics research or materials testing
If your lab is doing high-end acoustics research, validating material sound absorption/insulation or supporting regulatory compliance → choose a Class 1 sound level meter.
Why: The broader frequency response, lower maximum uncertainty and higher stability are key when measurement errors must be minimised.
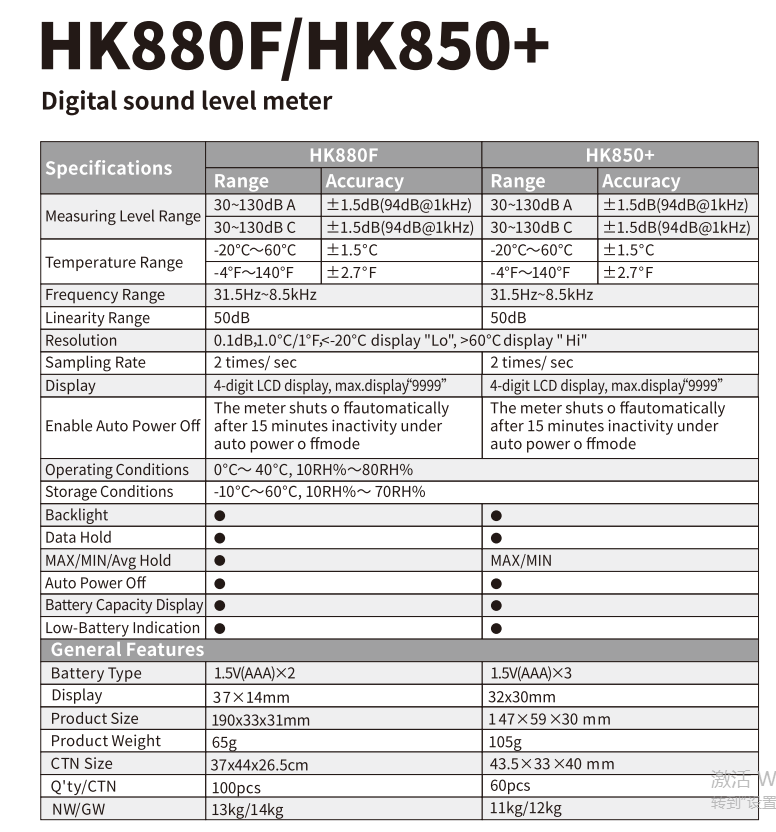
Features to look for: wide dynamic range (e.g., 10 Hz–20 kHz or beyond), octave/1/3-octave filters, integrated logging, calibrator traceable to national standards.
Long-term tip: Build a calibration schedule, keep environmental conditions stable (temperature/humidity), and perform repeated verification.
Teaching lab, basic environment noise monitoring
For classroom demos, introductory acoustic labs or routine monitoring where ultra-precision is less critical → a Class 2 sound level meter may suffice.
Why: Cost-effective and simpler to operate, still compliant with IEC 61672 for many applications.
But: If you later intend to publish or certify results, you may need Class 1 anyway.
Engineering/industrial site visits from lab
If your lab instrument will also be used for field visits (site noise, operator exposure) → you might choose a Class 1 meter (so that you cover the highest requirement) or a robust Class 2 with known limitations.
Tip: Check whether your national or local regulation mandates Class 1 for certain noise levels (e.g., when measuring below 35 dB(A) in some jurisdictions).
In fact, in China environment noise standards indicate that when A-weighted sound levels drop below ~35 dB, a 1-level instrument may be required.
Long-term environmental monitoring / data-logging
When the objective is tracking trends over weeks/months rather than point measurements, you still need good stability, data-logging and remote interface.
Choice: Class 2 may work if the measurement accuracy tolerance is acceptable, but given the long term drift and data value you may prefer a Class 1 for confidence.
Key features: remote access, automated scheduling, built-in self-test, anti-drift calibration reminder, long battery or mains option.
Selection Checklist for Sound Level Meters
Standards & Compliance
- Ensure the instrument specifies compliance to IEC 61672 (or your national equivalent like EN 61672, ANSI/ASA S1.4) for either Class 1 or Class 2.
- If you will publish or submit results to regulatory bodies, check they accept the meter’s class for your measurement scenario.
- Ensure the meter’s manufacturer provides a pattern approval certificate or equivalent.
Accuracy & Uncertainty
- Confirm the meter’s performance band: frequency response, dynamic range (dB span), temperature/humidity operating conditions.
- Ask for manufacturer’s specification for measurement uncertainty (±x dB) and repeated-measurement reproducibility.
- Plan for calibration: does the supplier provide calibration options traceable to National Metrology Institute?
Frequency & Time Weighting, Band Analysis
- Ensure the meter supports A-weighting (dB(A)), and if required, C-weighting and Z-weighting.
- If required for your lab, ensure you have octave/1/3-octave band filters (for low-frequency noise, HVAC, emission labs).
- Check time weighting options (Fast, Slow, Peak, Impulse) and ability to compute Leq, L10, L90, SEL etc.
Data & Interface
- Data logging: memory capacity, sampling interval, timestamp, format (CSV, binary), interface (USB, RS-232, Ethernet, WiFi).
- Software support: compatible for data import/export, statistical analysis, report generation.
- Remote operation: if you’ll mount the meter in a remote lab space, check for remote control or data streaming capability.
Calibration & Maintenance
- Choose a meter with accessible calibration routine; calibrator should itself be traceable.
- Plan for periodic calibration or verification (intervals recommended e.g., annual or bi-annual).
- Ensure documentation of calibration certificates, versioning, model number and serial number for audit trail.
Practical and Durability Considerations
- Ensure measurement range suits your lab environment (e.g., if very quiet < 30 dB or noisy > 130 dB).
- Consider microphone type, mounting (tripod vs handheld), self-noise of the instrument (important for low-level labs).
- Consider durability: Is the meter portable or bench-mounted? Are there environmental protections (dust, humidity, shock)?
- Consider cost vs lifetime: Higher class (Class 1) instruments cost more but deliver better stability and value for critical measurement tasks.
Deployment Advice for Laboratory Setup
- Define your primary use case: Are you doing high-precision research, regulatory compliance, teaching, or long-term monitoring? That will guide class choice.
- Budget wisely: Allocate budget not just for the meter, but for accessories (calibrator, tripod, software), calibration, and maintenance.
- Field-test before purchase: If possible, request a demo or sample measurement in your lab environment to verify noise floor, microphone placement, and user interface.
- Establish a calibration / verification schedule: Document staff training, calibration records, measurement procedures and ambient conditions.
- Implement measurement protocols: For example, microphone placement (height, distance from reflecting surfaces), measurement duration, statistical handling of data.
- Plan for future expansion: If you might expand into 1/3-octave analysis or higher-end noise research, consider choosing a meter with that capability (or upgrade path) from the start.
Frequently Asked Questions
Q1: Can we use a Class 2 meter in the lab for all tasks?
Yes for many routine monitoring or teaching tasks. But if your measurements must feed into published research, regulatory compliance, or very low/high-level sound measurement, a Class 1 meter is strongly recommended (or required by regulation).
Q2: What is the difference in tolerances between Class 1 and Class 2?
The tolerance (maximum deviation) allowed for Class 2 is larger than for Class 1. In general Class 1: tighter error margin, broader frequency response, wider dynamic range.
Q3: How often should a sound level meter be calibrated?
Typically annually or biennially, depending on usage, manufacturer’s recommendation and criticality of measurement. Using a calibrator before each major measurement session is also good practice.
Q4: Why is A-weighting used so often (dB(A))?
Because A-weighting corresponds more closely to human ear sensitivity and is widely mandated in environmental and occupational noise standards.
Q5: My lab measures very low sound levels (below 35 dB(A)). Does that affect class requirement?
Yes. Some regulations specify that when sound levels are very low (e.g., < 35 dB(A)), you should use a higher-accuracy (Class 1) meter because the margin of measurement error becomes more significant relative to the signal level.
Q6: Does the Class 1 meter always produce “better” measurements regardless of environment?
A Class 1 meter offers better specification, but only if used correctly (correct placement, calibration, environment). For some lab tasks, a Class 2 meter sufficiently meets the required accuracy. It’s about matching the tool to the requirement, not always “the best is always best”.
At Honeytek, we specialise in precision electronic measurement tools.
