
In high-intensity GPU workloads—such as crypto mining, workstation rendering, and multi-instance gaming—thermal issues are often the real cause behind instability. Throttling, random crashes, blue screens, or sudden performance drops are frequently blamed on “high core temperature,” but in many real-world cases, the problem hides elsewhere.
VRAM chips, power MOSFETs, inductors, and capacitors often overheat silently. Traditional software monitoring tools only report GPU core temperature, leaving these critical components invisible.
This is where infrared thermal imaging maintenance becomes a game-changer.
By using an infrared thermometer or thermal camera, GPU heat distribution becomes visible—allowing technicians to pinpoint overheating zones precisely, reduce guesswork, and apply targeted fixes.

Why Infrared Thermal Imaging Is Essential for GPU Maintenance
Compared with contact probes, temperature guns, or monitoring software, infrared thermal imaging provides three decisive advantages:
1. Full Heat Distribution Visualization
A thermal image instantly shows how heat spreads across the GPU PCB.
- Hot areas appear in red or orange
- Cooler zones show green or blue
VRAM modules, power stages, and chokes are visible at a glance—no disassembly required.
2. Accurate Detection of Localized Overheating
Many GPUs throttle not because the core is too hot, but because:
- VRAM exceeds safe limits
- A single MOSFET overheats
- Poor thermal pad coverage creates a “dead zone”
Thermal imaging identifies these issues immediately—especially common in mining GPUs and aging graphics cards.
3. Non-Contact, Zero-Risk Measurement
Infrared measurement requires no physical contact:
- No static discharge risk
- No accidental damage to components
- Ideal for professional GPUs and high-value cards
Step-by-Step: GPU Thermal Imaging Inspection Under Full Load
1. Preparation
Equipment Needed
- Infrared thermometer or thermal camera
- GPU stress software (FurMark, 3DMark, Blender, OctaneRender, etc.)
- Well-ventilated open test bench
Environment
- Stable ambient temperature (25–30 °C recommended)
- Avoid airflow interference from air conditioners or external fans
GPU Pre-Check
- Clean dust from fans and heatsinks
- Confirm fans and heatpipes function normally
2. Thermal Scanning Procedure
- Run GPU at 100% Load
Stress the GPU for 10–15 minutes until temperatures stabilize. - Perform Infrared Scan
Hold the infrared device 20–30 cm from the GPU and scan slowly:- GPU core area
- VRAM locations
- Power delivery section (MOSFETs, chokes, capacitors)
- Capture Thermal Images
Save images or record peak temperatures for comparison.
3. Reference Temperature Thresholds
| Component | Recommended Max (Full Load) |
|---|---|
| GPU Core | ≤ 85 °C (Throttling above 90 °C) |
| VRAM | ≤ 90 °C (Degradation above 100 °C) |
| Power MOSFETs / Inductors | ≤ 100 °C (Risk above 110 °C) |
Common GPU Cooling Problems Solved with Thermal Imaging
Scenario 1: VRAM Hotspots Causing Throttling
Many GPUs prioritize core cooling but leave VRAM under-cooled.
Thermal Imaging Result:
- GPU core: normal
- Several VRAM chips: deep red zones
Solution:
- Add correctly sized thermal pads
- Install auxiliary aluminum or copper heatsinks
- Improve airflow path to VRAM region
Scenario 2: Power Module Overheating and Early Failure Risk
Power delivery components age rapidly under sustained heat.
Thermal Imaging Result:
- One MOSFET significantly hotter than surrounding parts
Solution:
- Add small heatsinks with thermal adhesive
- Replace aging components proactively
- Prevent future power instability or GPU failure
Choosing the Right Infrared Thermometer for GPU Work
For GPU maintenance, you don’t need a laboratory-grade thermal camera. A reliable entry-level infrared instrument is sufficient.
Key Selection Criteria
- Temperature Range: –20 °C to 300 °C
- Resolution: ≥ 160×120
- Response Time: ≤ 200 ms
- Display: Integrated screen with adjustable brightness
Manufacturers like Honeytek supply infrared thermometers, digital multimeters, and clamp meters designed for electronics diagnostics—supporting OEM customization for professional maintenance teams and service centers.
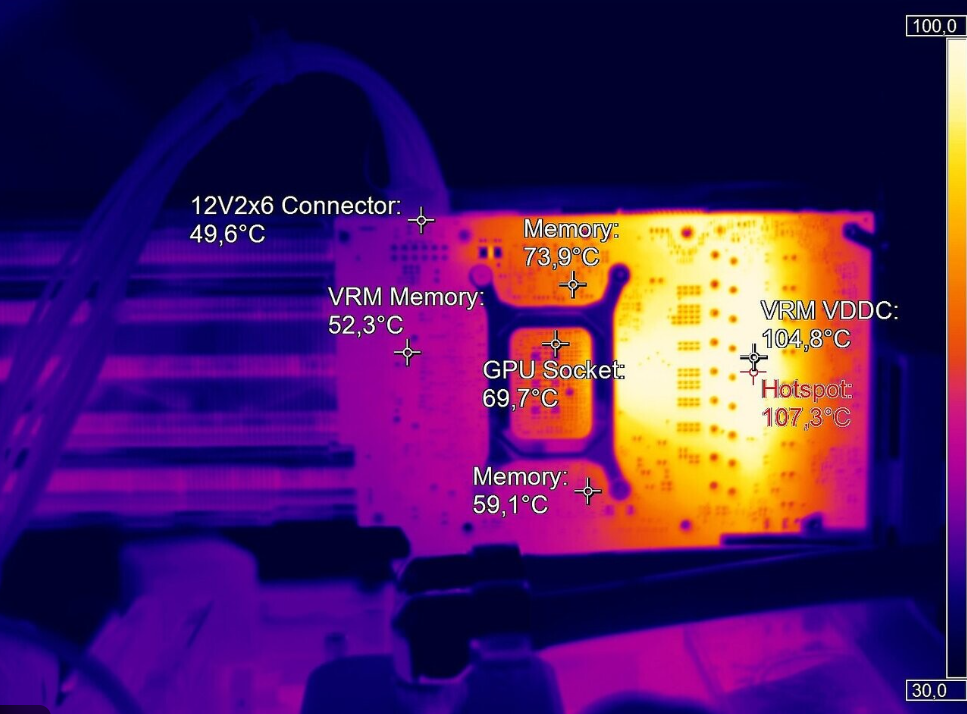
Real-World Case Study: Solving GPU Throttling with Thermal Imaging
GPU: RTX 3080 (Workstation / Mining Use)
Problem: Frequent throttling and blue screens
Software-Reported Core Temp: 82 °C (normal)
Thermal Imaging Findings
- GPU core: 83 °C
- VRAM hotspot: 108 °C (critical)
- Power module: 95 °C
Corrective Actions
- Clean heatsink and PCB
- Replace VRAM thermal pads with 2 mm high-conductivity pads
- Add custom aluminum heatsinks to VRAM
- Install small heatsinks on MOSFETs
- Reapply high-quality thermal paste
Result After Repair
- VRAM temperature reduced to 85 °C
- Power module stabilized at 88 °C
- No throttling, stable performance under sustained load
Frequently Asked Questions (FAQ)
Is a thermal camera better than software GPU monitoring?
Yes. Software only reads internal sensors. Thermal imaging shows real surface heat, including VRAM and power stages without sensors.
Can an infrared thermometer damage a GPU?
No. Infrared measurement is completely non-contact and safe.
How often should GPU thermal imaging be done?
- Mining GPUs: every 3–6 months
- Workstation GPUs: annually or after performance issues
- Gaming GPUs: when throttling or crashes appear
Do I need to remove the heatsink to scan?
No. Most thermal issues are detectable externally under load.
Are OEM infrared tools reliable?
Yes—when sourced from established manufacturers with calibration control and electronics-grade accuracy.
Thoughts: See Heat Before It Becomes Failure
Infrared thermal imaging turns GPU maintenance from guesswork into precision diagnostics. Instead of replacing parts blindly or blaming the GPU core, technicians can see exactly where the problem is—saving time, money, and hardware.
Whether you manage a mining farm, a rendering studio, or professional repair service, investing in infrared diagnostics is one of the smartest maintenance upgrades you can make.
If you’re looking for reliable infrared thermometers, digital multimeters, or clamp meters for GPU diagnostics or electronics maintenance—and need OEM support or bulk supply—contact Honeytek today.
You May Also Be Interested In:
- When Do You Need a High-Precision True RMS Multimeter?
- Functions and Selection Guide for Automotive Diagnostic Multimeters
- Honeytek A616 vs A600: A Practical Comparison for DIY Automotive Enthusiasts
- The Role and Selection Guide for Automotive Multimeter Test Leads
- The Importance of Safety Ratings (CAT Levels) in Hybrid and Electric Vehicle Diagnostics
- Clamp Meter vs. Multimeter (DMM): Which One Should You Buy?
